


How to Create a Project Timeline: A Simple Step-by-Step Guide


Project management timelines are so effective because this is what they do. They show what needs to be done, when, and who is responsible. With the right setup and tools, project managers and stakeholders can immediately identify what’s urgent and what’s late. They can show you critical paths of dependencies that would delay the project or put it on hold.
In this article, we’re exploring how to build a project timeline from scratch.
We’ll dive into the key elements, what to prepare, how to create your timeline, and how to adjust. Whether you’re a seasoned project manager or new to this field, we’ll help you track every project to hit its key milestones on time.
What Is a Project Timeline?
At its core, a timeline highlights the project’s status: when tasks begin and end, key milestones that mark overall progress, and how tasks connect.
The core idea is that it is visually representable, like a highway road with several traffic and information signs. This way, every team member can quickly see what they need to do and when, making it possible to stay on track, forecast, and adjust when necessary.
Depending on how you build your project and timeline, you might have different information visible, such as a team’s capacity or holidays. But to stay on track, you must at least have:
- Start and end dates: Knowing when each task starts and ends is crucial as it helps align everyone on the project’s targets and the timeline of events.
- Key events and milestones: These are checkpoints or goals that mark important project phases. They serve as pit stops to celebrate progress and re-assess the plan forward.
- Dependencies: Naturally, some tasks will depend on others. Having a natural sequence of events helps the project progress so everyone can hit the key milestones. It also helps prevent potential blockers.
A well-designed project timeline goes beyond just scheduling or staying on track. It can provide:
- Clarity: When tasks, deadlines, and dependencies are laid out, every team member understands their responsibilities and the overall plan. They’ll know what’s urgent, which helps them prioritize their tasks from multiple projects.
- Accountability: When deadlines and milestones are visible to everyone, the project team is more likely to stay on track.
- Efficiency: Accountability can naturally increase efficiency. Since tasks are organized logically, this helps ensure that work flows smoothly from one task to the next without unnecessary delays.
- Early problem detection: A visible project timeline that is constantly updated and shared with everyone can quickly reveal delays or missteps. It becomes an early detection system that prevents small issues from growing into major setbacks.
- Transparency: A shared, updated timeline informs everyone about the project's progress. This increases transparency, which promotes better communication and coordination between members.
Step-by-Step Guide to Creating a Project Timeline
Let's look at how you can create an effective project timeline.
1. Set the Project Scope and Goals
The first step is to create an effective timeline to define the project scope and goals. Without this, it will be difficult for you and the team members to make sense of the project and its direction. One way to do this is to use the SMART method:
- Specific: Each objective should be specific and clear. For example, instead of “increase homepage performance,” specify “increase homepage load speed by at least 20%.”
- Measurable: Non-measurable goals can be tough to interpret, preventing progress from being monitored. Decide how you’ll know whether the team has achieved the desired goal through key performance indicators (KPIs), milestones, or team checklists.
- Achievable: Given the resources, time, and expertise, project goals must be realistically attainable. It’s great if a team member has a big idea that can solve the project with a massive overhaul of the current systems. But first, ask yourself and the others if it’s within reach. It’s often easier for everyone to start with the must-have goals first, making the project much more achievable in a shorter timeline.
- Relevant: Ensure that each goal aligns with the project's overall mission. Everything else becomes out of scope. Doing this avoids scope creep when projects expand unnecessarily, waste resources, and derail.
- Time-bound: Set deadlines for each goal. This creates urgency and keeps the project moving forward.
Now that you know how to use SMART to identify the right project goals and tasks, here’s what you need to do.
First, meet with all the stakeholders to discuss the project scope. These could be your team, heads of other team members, clients, and any outsourced teams. This session is where everyone agrees on what they need to deliver.
The ultimate goal of this meeting is for every stakeholder to understand and commit to the project’s objectives. Depending on the size of your organization, you may need to give each team some time to brainstorm and come back to you with rough estimates, such as the tasks they need to complete for that goal and the total effort or time they need to put in. This is common with complex projects that span across multiple departments.
A few questions that experienced project managers ask during this meeting include:
- What are the critical objectives?
- What might derail these goals?
- Are there any hard deadlines for these goals?
Once you’ve listed all the objectives, prioritizing them with your stakeholders is often helpful. One way to do this is to use the Must Have, Should Have, Would Have, Won’t Have principle. This will serve three purposes:
- Break down the scope further to clarify what the project is about.
- Categorize goals into crucial and non-crucial ones. Even if the project goes wrong, delivering the most critical objectives would still be a win over delivering the "should haves.”
- Create a Minimum Viable Product (MVP). For example, if the project is driven by a new upcoming law, the MVP part might contain all the changes to abide by the law. After the MVP, the project will have phases to improve the customer experience affected by those changes.
Once you have all the stakeholders' input, it’s time to create a simple document outlining the project goals, scope, and key deliverables. This document will become your reference point throughout the project. It will allow you and other department heads to make decisions that align with the original objectives and ensure that the project goals stay within scope.
2. Identify Key Tasks and Break Them Down
Once you’ve created the project scope and primary goals, the next step is to break the project into manageable tasks. This is where a Work Breakdown Structure (WBS) can help.
Start by listing all major tasks. Then, divide each into smaller, actionable subtasks. You can create bulleted lists, charts, and mind maps.
This approach makes each task less daunting and helps track progress more effectively. For example, if your project is to build a house with three floors, and each floor is a significant task, creating subtasks makes it much easier for everyone to know what’s next in line and whether each floor is being properly built.
Bear in mind that a WBS is not set in stone. As the project progresses, you may need to refine the tasks. It’s often the case, especially when working with large teams, that you’ll receive rough estimates at the beginning. Then, with each phase, you can expect a more accurate forecast.
Modern tools like Flowlu have built-in features to help you easily create and manage a WBS within the project setup. This makes it easier to link the tasks, timeline, and WBS together.

3. Determine Dependencies
Once you have a WBS, the next step is identifying any dependencies. You’ll likely need meetings with the stakeholders to plot these, as they’ll know the ins and outs of what needs to be done. You may encounter several types of dependencies, including:
- Sequence: These are tasks that you perform in sequence. For example, in an advertising project, a design task would typically involve brainstorming, sketching prototypes, and finalizing designs in that order.
- External: Sometimes, there may be dependencies on other projects or external tasks, like maintenance or administrative tasks. For instance, a customer-facing project may depend on software back-end upgrades or changes that may be part of another project.
- Resources: Say your project requires a copywriting team, but they’re blocked with other projects. This makes them dependent.
- Finish-to-start: These are task dependencies in which team members have to complete task A before starting task B. They are also known as sequential tasks.
- Start-to-start: These are task dependencies where task B can start when task A starts.
By mapping out these dependencies, you can identify immediate blockers, if any, and create a logical flow from one phase to the next. This ensures that no task is left waiting for another unnecessarily too long.
The easiest way to do this is to use a tool that allows you to visualize the dependencies with a Gantt chart. Visual representations like this can help clarify the sequence of activities and their dependencies.
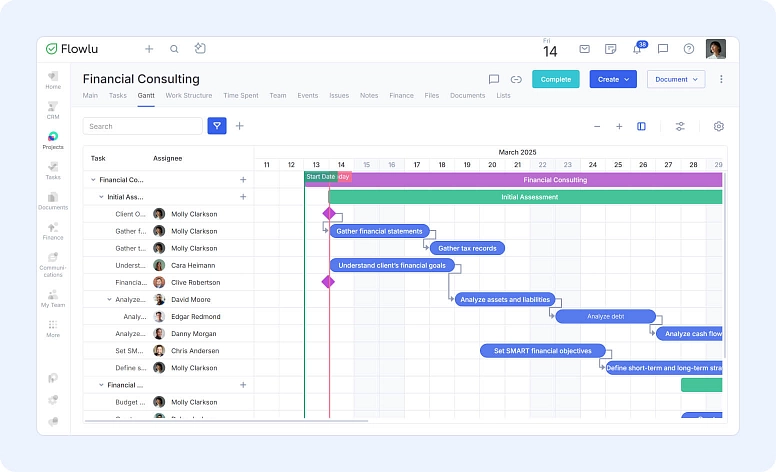
Some tools automatically update the timeline as you adjust the dependencies.
4. Set Deadlines and Milestones
Deadlines help ensure that everyone meets the project schedule. They create accountability and help plan subsequent tasks.
Assign realistic deadlines with buffer times to account for unexpected delays. Relaxed deadlines can lead to complacency. Subsequent tight deadlines can lead to rushed work, burnout, and more team members falling sick or simultaneously requesting time off.
Your stakeholders will usually provide you with effort estimates. However, you can also use past project data to estimate task duration during the project’s infancy.
On the other hand, a project milestone defines a significant checkpoint. These inform everyone that a key phase has been completed and boost stakeholders' morale.
Typical milestones might include:
- Research completion
- First draft finished
- Final review completed
- Project launch
Visual tools, such as Gantt charts, make it easy for everyone to see upcoming deadlines and milestones, helping team members plan their work.
5. Allocate Resources and Assign Responsibilities
Now it’s time to allocate resources, whether that’s time, tools, or people.
Start by listing all the resources you need for each task. This could be an effort from other teams measured in work hours, budgets, software, or even expertise the company needs to headhunt for.
Then, assign responsibilities by matching the tasks to the teams or team members. This creates transparency and accountability while minimizing confusion about who needs to do what.
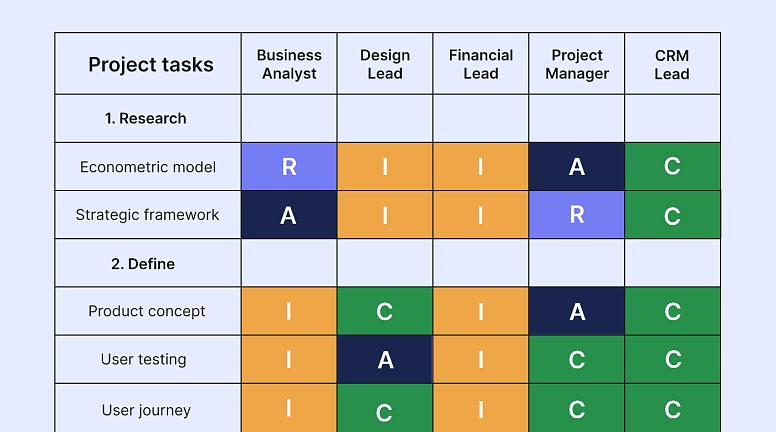
You can use tools like a RACI matrix to set this up. This matrix shows who is:
- Responsible: Who will execute the task?
- Accountable: Who will ensure the task is completed correctly?
- Consulted: Who should be consulted during the task?
- Informed: Who needs to be kept updated?
Here’s an example of a RACI matrix split by tasks.
However, keep in mind that resource allocation is dynamic. If a team member is busy and can’t keep up, your project management tool should have an easy way to redistribute tasks quickly in real time. This makes it a lot easier than recalculating everything yourself whenever efforts change, teams get assigned other projects, or people book vacations.
6. Monitor, Adjust, and Communicate Changes
No project is without risks, and anticipating them before they arise is one of the fundamentals of project management. A proactive approach helps you identify what could go wrong and prepares you and the stakeholders to adjust without derailing the project.
This is why a project timeline is not a static document. It is alive and constantly changing as the project progresses.
Here’s how you can do this while maintaining the project timeline:
- Identify potential risks: Consider all the stages, tasks, and resources to identify things that might not go as planned. These could be anything from technical issues, approval delays, and missed requirements leading to effort recalculation.
- Regular check-ins: Set up weekly or bi-weekly meetings to review the timeline. This helps keep everyone on the same page and address potential issues early. Update deadlines and reallocate resources as needed.
- Lessons learned: Record any change requests and modifications made to the timeline. This becomes a learning tool for future projects. It helps you and all the stakeholders understand what worked and what didn’t.
Key Features To Look For in a Project Management Tool
The bigger the project and organization, the more likely it is that you’ll need to update the timeline quickly and monitor potential downfalls. An ideal tool like Flowlu should simplify planning, enhance collaboration, and provide real-time insights and feedback. This will help you stay on top of deadlines and deliverables.
Here are some of the things you should consider before committing to a project management tool:
- Task management: The platform should allow you to quickly create, assign, and schedule tasks. It should also provide multiple viewing options, such as list views, tables, Kanban boards, and Gantt charts. Project management templates typically include examples that make it easier to start.
- Task dependencies: Look for a tool that allows you to easily link tasks, define dependencies, and provide a visual view to reduce the risk of bottlenecks.
- Milestone tracking: The platform should allow you to easily set milestones to indicate project achievements. It should allow you to connect tasks and efforts to those milestones so that you can track the overall progress.
- Collaboration: Look for a tool to chat with stakeholders, post project updates, and comment on tasks. You’ll also need to tag people so they can be notified, reply, and stay informed about the project status.
- Reporting: The platform should provide real-time snapshots of the project's progress. Detailed reports on resource utilization, critical paths, risks, and budgets can be beneficial for spotting issues and adjusting.
Common Mistakes to Avoid
Even the best plans can go off track sometimes. Here are some common mistakes and fixes to help you make the project timeline a powerful tool instead of a source of stress:
Unrealistic Deadlines
The problem:
Setting tight deadlines can put too much pressure on your team, leading to rushed work and lower quality.
The fix:
It’s okay to use rough estimates initially, but add extra time for unexpected delays. To create more accurate forecasts in the future, use past lessons learned and charts showing the initial estimation vs. actual effort of different teams. This helps prevent stress and maintain consistent quality.
Ignore Task Dependencies
The problem:
Overlooking relationships between tasks can create exponential delays. If one task gets delayed, it may hold up several subsequent tasks, derailing the entire project.
The fix:
Map out which tasks depend on others, and use views like Gantt to visualize these relationships. Never rely on manually building your Gantt chart or timeline separately from the actual project, as this can lead to inconsistencies.
Poor Communication
The problem:
Important tasks can easily slip through the cracks if stakeholders aren’t informed about updates or changes. Lack of clarity can lead to inefficiencies, misunderstandings, and mistrust.
The fix:
Centralize all communication using a dedicated platform. Hold regular short meetings to receive project debriefs and ensure everyone is on the same page about the progress.
It also helps to have a review process where everyone can pitch in. This helps ensure that team members identify minor issues early before they escalate.
Setup Complexity
The problem:
Fragmented systems and complex setups complicate both project management and the actual project. When tools and information are scattered across various platforms, it’s easy to lose track of them.
The fix:
Streamline your project management setup by using a centralized hub or platform. Consolidating helps reduce the risk of miscommunication and improves efficiency.
For example, implementing intranet software gives your team a centralized hub for project management timelines, updates, and key files—eliminating the hassle of endless email threads.
If most of your team works remotely, the right remote employee software helps track progress, manage tasks, and keep everyone connected across time zones. With the right tools, you’ll spend less time chasing updates and more time driving results.
Timeline Complexity
The problem:
Usually, the more information you have, the better you and your team members can understand what’s happening and identify potential roadblocks. However, including everything in the timeline can become too cluttered, slowing progress instead of adding more value.
The fix:
Focus on the big picture. Include crucial significant tasks and milestones, but avoid including every minor task or to-do item. Leave the minor tasks for the respective stakeholders to set up in their own mini-projects. A clean, high-level timeline is essential for you to follow and communicate clearly with everyone.
Final Words
Creating a project timeline is not just about marking dates on a calendar. It’s about building a dynamic, real-time visual plan that guides your project from start to finish.
By defining clear goals, breaking down tasks, setting realistic deadlines, and continuously monitoring progress, you can ensure everyone stays accountable and meets the objectives.
A project timeline visually maps out your project’s tasks, deadlines, dependencies, and milestones. It helps everyone involved see what needs to be done, who’s responsible, and when it needs to happen. This clarity helps teams stay on track, spot blockers early, and adjust quickly when plans shift.
Start by setting clear project goals using the SMART method—specific, measurable, achievable, relevant, and time-bound. Then, break the project into smaller tasks, identify dependencies, set deadlines and milestones, and assign responsibilities. Use tools like Gantt charts to keep everything connected and easy to follow.
Some of the most common mistakes include setting unrealistic deadlines, overlooking task dependencies, poor communication, and overloading your timeline with too much detail. Using the right tools and keeping communication centralized can help avoid these issues and keep your project running smoothly.